Wednesday, July 1, 2009

Windows 7 RC 1 can have my baby


No, I am not a windows fan boy, ok yes I am, but windows 7 is pretty sextastic. I have been using it since beta, and boy oh boy, is it ever awesome. If you haven't been trying it out I pity the fool. Yes, I did just say that.

Windows 7 just feels smarter, and leaves you with a much fuller experience. When I first installed it I expected that most of my devices would not work. Not so, my GTX 285 displayed the wallpaper perfectly.

Do not get me wrong, I did have to install drivers, and hell, I know better than to just use the default ones. I will not even use the drivers that come with my video card in the box, but just having it appear like that from the get go was really nice.

The windows 7 task bar is epically useful. When minimized I am able to preview the window by simply placing the cursor over the icon.

If there is more than one window open in Firefox for example, the minimized view will pop open however many previews are needed to see them all! It gets better, place the cursor over a minimized preview and it will open that select window. Click on it, and it open only that window. Windows' IQ just went up a standard deviation.

The windows themselves are even smarter as well. I hate having to re-size windows in order to either fill a screen or move or to a different monitor. Now all you have to do to maximize a screen to fit the monitor it place it at the top of the screen and it will auto-fill. If I need to move a window I just grab it from the top with my cursor and throw it over without having to re-size it first. What the hell was the point of locking the screen anways?

It really is all the little things that have delighted me. Of course there are a ton of improvements, but honestly nothing will substitute first hand experience. Windows 7 RC 1 has left me asking, were the hell was this OS hiding? It may be based off of Vista, but is feels like a whole different animal, and I don't mean a leopard.

Clearing the Cobb Webs, with a RAID

It has been an eternity since my last posts, and yes I know shame on me. I am working on some projects right now, most currently, a raid 0 with windows 7 RC 1. The configuration consist of 2 750gb caviar green Western Digital drives. They combine to make one 1.36 TB drive. I have dubbed such drive "The VOID". Hopefully I will fill it with awesomeness soon enough. The other drive is a Seagate 320gb drive which is near filled. So at the moment I have two windows 7 RC OS one on each drive. I was surprised to see a boot menu appear, that allows me to choose which hard drive I want to boot from. I am used to seeing that with windows Vista, as it will list "earlier version of windows". I don't really understand the logistics of not just saying what OS it is, but whatever. One issue with having two windows 7 OSs is that it is impossible to know which is which unless you just know that the first is the raid and the other is the 320. Ideally I would just transfer everything I want from the 320, to the RAID, clear the 320 and then back up the really good stuff on it. This way it would be sans OS, which saves room for....yes.....awesomeness. Setting up the RAID was as easy as people would lead you to believe, and particularly easy on my motherboard (EVGA 780i).

First step was to enable the RAID on the SATA ports

Second step was to press F10 on boot up and set it up

Here I was presented with a bios like screen. All that needed to be done was to move over the 2 drives to the compile selection box, and select "striped" which I wanted cause I am looking for performance. Then it asks if all the crap can be deleted, which I pressed 'Y' to. I found I also needed to delete the master boot sector for windows to be able to install on the raid. You may or may not get the prompt.

The installation of windows 7 RC 1 took about 20 minutes, which was pretty impressive. I am used to a good 40-45 min for it to complete. I am getting pretty used to this whole RAID thing.
It is pretty effing awesome actually.

Sunday, April 5, 2009

Dun..Da..Dun..Dun


Here is my VERY hard work and sweat in action. The 1.8mm white diffused LEDS are not exactly the right size, so I had to modify the button gap to accommodate the ever so slightly larger kick me in the nuts LED. I just laughed to myself, as my girlfriend looked on with a look of bewilderment, when I first tried to fit the LED in its "home". COME ON LED, ARE YOU TO GOOD FOR YOUR HOME? Maybe it was...but I fixed that. The UV LED is really hard to see in this video, I suppose the camera I was using did not pick up the UV very well. The UV is not overwhelming to begin with so it is not surprising. I have said this before, but I will say it once more. If there are any requests to see anything specific, or how I did any of what you see, just let me know!

Thursday, April 2, 2009

Last stages before phase II...


These pieces of plastic were the old base for the case. (ALL YOUR BASE ARE BELONG TO US!)
Anyhow, they need to be modified HEAVILY for the bottom mounted fan and casters to fit. Out came the dremel and my trusty Daisy safety glasses that I got with my pellet gun. Funny thing, I was 99.99 percent done and I noticed that I miss a bit to dremel, so I figure this will take one sec, no need for safety glasses, and just as I was mid thought saying that in my head a molten piece of plastic flew into the corner of my eye. IT DID NOT FEEL AWESOME. Wear the stupid glasses, unless you want to look like a pirate one day...

Here you can see that putting the original base on make a big difference ascetically. It was worth the extra work to get it to fit back on there.

This is the serendipitous part of the build were I ordered the wrong size fan, but ended up being a great idea starer for another mod. I meant to order a 120mm fan from xoxide.com but instead ordered a 80mm fan. I was very confused when I opened the package when it had arrived. I figured what the hell I might use it on something in the build, and I was right...


I really do not like keeping accessories in the the accessories box, so I was determined to make this one vestigial part of my case into a feature of the build as well.

The exposed nut securing the fan needed to be dressed up a bit. That is were some spay painted contact paper came in..


Here are some shots of it all put together. I really was happy with the outcome overall.


Not really mentioned in detail at all, is the toggle switch I mounted in the box as well. This will control the cold cathode lights.

Wednesday, March 18, 2009

Coming together....

Here the caster were held in place temporary with these weird bolts I had found in my stash. I have lots of screws and nuts that I will probably never use, but then again I probably thought that of these very nuts/bolts.


That black and white nexus fan look downright tasty! I am really liking the look of the black and white. I really is giving the case a certain level of chicness not commonly found in a computer case. On that note, why is it that so many of out everyday items are made without any soul? Like TV, cell phones, computers so on and so forth. This has never been brought us anyway that I can tell, but computer modding is a craft. It encompasses both the realms of function and art. I suppose that is why it is so badass.


I know a lot of people would have me cut out the fan grill, but I really like the way it contrasts with the white fan, and gives a deeper level of detail to an otherwise straight forward black and white case. Now that I am putting it together, the case looks like it should have been this way from the start. It looks so natural, that some people that do not know what I started with would never have thought that I had done anything at all to it. I think that is the pinnacle of what I am trying to accomplish here with my modding, and will be my calling card so to speak. I hope down the road, many many build from now, people will be able to recognize my work on sight.

The casters now have proper non-weird ass bolts and nuts. I just have a few concerns with the new caster mounting spots interfering with the hard drive cage mounting points. I guess I will deal with that when it comes.


This video is just a quick walk around the case. The last shot is of the hole I drilled for the bottom mounted fan, and the grommet I inserted for the wire.

Thursday, March 12, 2009

Grommet Edging ( I know it is a shitty title)


Just found a source for grommet striping. It is the same thing as "u-channel" or "c-stripping". Being as I will need a lot of this stuff for modding, I did not want to pay the premium for getting it in 6 foot lengths. I can get 100 feet for about 32 bucks. It is the difference of paying $1.50 a foot from mnpctech not including shipping, and paying 32 freaking cents a foot, including shipping! If anyone wants the source, just let me know. I do not think mnpctech is ripping people off, but if I want to still have money for parts I have to buy smart.

Monday, March 9, 2009

Moving on to more technological pastures

During my move to my new apartment, working on my project won't be really possible, but I do not want to leave you hanging. I am going to try and post ideas, links, and some of my favorite sources for parts.

Since LEDs are the current topic, I will share my source for them. Unfortunately, they kinda dropped the ball on having the 1.8mm white diffused LED, but they have most anything you will need in the LED department. Great thing about them, it they sell individually, and have price breaks at higher quantities that are reasonable. It can really save you some cash, if you avoid radio shack at all costs. A white LED at the shack will set you back like 5 bucks!! That is just stupid. I am sure there are more good sources for LEDs, but this is what I use most.

http://www.unique-leds.com/

If you could not tell already, case fans get me pretty randy. So far, most of the build I have used xoxide.com. They have decent pricing, and since they are local, they don't rape me on shipping charges. I had an issue with one of there sleaving kits, and their customer service refunded me in full! I did not even have to ship it back. That is what I call excellent customer service, and becasue they are so great I am a retuning customer.

Funny enough, most of my sourcing is done at Home Depot or Loews. They have tons of usefull modding stuff. The coolest find, I think was liquid tape. It is awesome for protecting bare wires, and is a great tool in my arsenel. Just make sure you pick up the black kind, casue they have red as well. That is, unless that is the look your going for.

Saturday, March 7, 2009

You light up my life


Here is a video of the LED mods done thus far. I have some white cold cathodes as well, but if they look bad, I am saving them for something else.

Friday, March 6, 2009

Buttons pressing my buttons


So last night I was replacing the LEDs for the power and HDD activity light. I replaced the HDD activity with and ultra violet LED and the power whith an ultrabright white one. For some reason or another, I had it in my head that the power LED also lit the power button. WRONG, so freaking WRONG. Turns out the button needs to be dissesembled just to get to the LED in it, and it is not your standard 5mm LED. It is a 1.8mm Diffused LED. Come on, what the hell. So now I have to track down a white 1.8mm diffused LED, awesome....I did find some on Ebay, but I have to buy like 50 of them. I need maybe 3, just in case I botch the job, not 50. As soon as I can, I will throw up some pics of the monstrosity.

Side note: I would like to apologize for the lack of content lately. I am moving out of my apartment, and stuff has been nuts. On the plus side, once I am in my new place, I will have a dedicated modding studio!

Sunday, March 1, 2009

HOLEY MOLEY!!!!


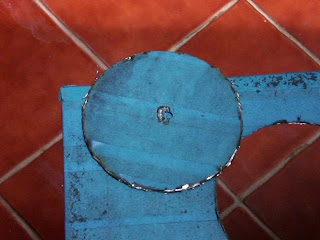
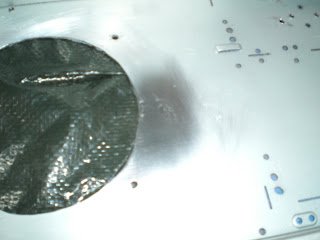
Cutting the hole was pretty freaking awesome. After the failed attempt with the rotary saw, cutting this sucka up felt pretty good. Once the first cut was in, the rest of the cutting was much easier. I really let the tool do the work, and tried not to breath in that dust.

Something about sparks flying just makes me feel like I am getting something done. I was not dumb enough not to wear eyeglasses. If there are red hot sparks involved, wear safety glasses for Christ sake. There is nothing manly about squirming on the floor in pain crying for you mommy cause you just got a red hot piece of metal in your eye.


Done! Now the only thing left to do with the metal is make a sweet shuriken of death! I am not one to be wasteful.


Thermaltake thought is was the best idea ever, to have raised lettering stamped into the metal (t design). I ground that sucker down. I simply won't deal with the question, "are your initials gn". No!

Stupid smooth, and better than that the "gn" is gone.
Here is the first coat of primer. I was pretty happy with the coverage I got with it.


Wednesday, February 25, 2009

Wheels Motha FO!!


These bigger casters give the clearance I was looking for. After all my intention is not to turn this bottom intake fan into a vacuum cleaner. Theses two and a quarter inchers are no joke. I suppose these would be the DUBS of the computer world.


I hit this one one up with the black spray paint I got, just to test it out. Let me tell you, I was not happy with the shinny shinny. I am going to have to go with straight up flat black. Although I must say I would take the shinny black over chrome any day.


Here the black VS. chrome. Both really stupid shinny.

Monday, February 9, 2009

The Armor MX+ Blackout Project


I frequent online computer parts stores more than I care to admit. I have been noticing a growing trend in the computer case scene, cases are going black. I don't mean just the exterior shell, I mean completely black, inside and all, and it looks great. Modders have been doing it for years, but the mainstream just woke up and is offering it to us out of the box. This is great, but I wanted to pay my respects to all those who did mods like this before. I decided to take my spare Armor MX+ case and black it out, the good old fashion way.

My Plans for the case:

1.) Black out all the bare metal pieces in the case. (of course)

2.) Possibly replace the fans with either white or black fans. Except the huge 230mm side fan. I am stuck with that one, and the blue LEDS in it.

3.) Replace the power LED (blue) with a white LED, as well as the hdd activity LED.

4.) Add holes on the bottom (either one or two) for 120mm fans. (Just like the Armor+)

5.) I believe there are already pre-drilled holes for casters. I would really like the extra clearance if I am adding fans to the bottom. Also it would make moving the case around so much easier!!


For those of you not familiar with the case, here are some pictures:


So this adventure begins with first being slightly nuts, and taking apart a perfectly good case.


The above are most of the parts from the case. Disassembling the case was pretty simple, except for one thing:


The clear side panel had these plastic rivet things. About a million of them. Not really. More like 20 of them, but they took much fussing with. All the while I had to make sure not to break them or the side panel. So funny enough, I handed that job to my patient girlfriend (that's her hand below). It was worth it though, because taping up the clear acrylic does not sit to well with me.


Below is the side panel with the window removed. Behind it is the "taping in progress" bare shell of the case.


I am using 3M tape. I am hoping it will stick well enough, so I don't get paint on what I am trying to cover. The roll looks like this:


The taping and dissembling are finished. I have yet to put up the rest of the pics. They will be up maybe tonight? I have yet to buy the SEM self etching primer as well.


Just for fun I thought I would post my current "in use" system. The case is an Armor+. You can get somewhat of an idea of what it looks like in action.


In the picture below, it looks like my heatsink is on crooked. I am pretty sure it is not, but this angle sure makes it seem like it. Also, the bottom spots for the 120mm fans can be seen. I want to achieve something like this in the Armor MX+.


I hid the Zalman fan control in the accessories tray, I would hate to have it stuck on the side of my case like some kind of cancerous growth. I had to dremel out a hole in the back of it to do this. Sometimes the cable disconnects. I should just glue it, but then I am kinda stuck for future changes.


I am taping up a foam PSU spacer in the case. I could have pulled it off, but taping was easy enough, and I did not want to have to glue it back. A lot of glues react pretty bad with foam.


All taped up, and ready to rock.


Below are what I think are pre-drilled holes for casters. There are holes like this on each corner. If there were no holes, it would be easy enough to drill them out anyway.


Trimming the excess tape would be pretty hard without my trusty razor. Go Exacto! Remember, this is not a how to, but if anyone has any questions feel free. Any requests for how to videos or anything will be considered.


Whenever I could, I would tape the screws to a piece that was not being painted. The less time I have to spend figuring the correct places for screws the better.


I am looking forward to taming these case wires, not real sure what I will have in store for them just yet. Perhaps, I can take a crack at sleeving what I can. They will be hidden for the most part, but if I am already going this far might as well go for gold.


I have been doing A LOT of research on parts lately. I am thinking about white case fans and white LEDs. I know it looks great already because it has been done before on black cases. See below:


This guy obviously knows his way around a computer case. The thing is freaking gorgeous. So many are tempted to stuff as much silly stuff in their cases as possible. I suppose I am minimalistic, in that I don't like to be bombarded with gaudy fan guards and a zillion cold cathode lights. I really am about the hardware inside the case, and that's what this is all really about. Letting the technological beauty shine. Don't get me wrong, some theme cases are simply awesome. I definitely can appreciate the craftsmanship that goes into them. Those cases are supposed to scream "Hey, look at me!" because after all, they are center pieces. I want to build something that really requires the viewer to take a closer look. It is not always about what is there; it is what you choose not to put there as well. I could very well go into an "Art Kid" rant. I won't. Haha, I will save that for some other time.

Enough talk, here are some fans I am looking at:


(Nexus 120mm Black & White case fan)


SilverStone SST-FM121-S (Silver Panel White Fan) Case Fan with Manual Adjustable Fan Controller (9 Blades)- 120mm


ENERMAX CLUSTER 12CM CASE FAN TWISTER BEARING 500-1200RPM CLEAR WHITE FAN

Part of my parts list is done. You can view it below. The Thermaltake is for the bottom, the Nexus is for the rear exhaust. Bought a grill to cover the inside bottom hole once it is drilled out. The Molex pin remover, will let me take off the plastic connectors. This is the only way I could get the Xoxide sleeving over fan wires. For the case wires, an Exacto blade works pretty well.


Good God. I just found a monster 250 mm white and black fan. Problem now is getting it. I am not sure if I can make it work. The stock side fan is 230 mm. The mounting holes are going to be way off probably. The real problem is that I think I will run into where the side panels clip goes in the Plexiglas. Damn, it is nice though.


I was also looking at the fan from the Cooler Master HAF (A23030-10CB-3DN-L1). It is solid black and exactly 230mm, and better yet it is pretty widely available.


The main reason that I want another side fan is that the blue LEDs are going to bother me in this case. I might just have to settle, but I really don't want to.

I started marking off the fan hole for the bottom.


The case wires are all sleeved after much work. Some before and afters for you all.


Yes, got to love beige cords. God all mighty, why beige of all colors? I think that pre-wrapped case wires will be the next step in enthusiast cases. They are already coming out with pre-painted cases right, why not go the small extra step and sleeve the case wires? Manufacturing costs would not be that high, but they could charge a decent amount more.


Not sure how I feel about the spit cable wrap in place of sleeving. It looks ok, but in the future I will figure something else out.

My fans are also in! Well some of my fans...


Below is the black and white Nexus fan after sleeving. It came with a 4 pin Molex attached, which I removed. Side note: the shrink tubing was not so good, I had to get slightly creative at times.


Below is a picture of the caster clearance vs. fan thickness. I am going to have to get bigger casters.


More to come...